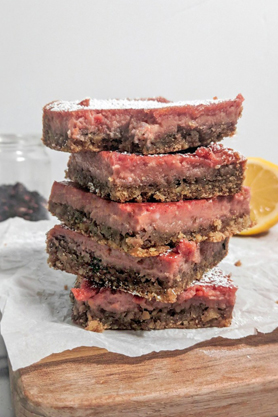
Hibiscus Lemon Bars by Feelin' Whisky

Recipe, words and photo by Emily at Feelin' Whisky.
I’ve got a thing for lemon. Offer me your widest array of desserts, and I’ll go for the bright, citrusy option every time. There’s just something about that twang that keeps bringing me back, even when I’m surrounded on all sides by tons of chocolatey options. So these Hibiscus Lemon Bars? Yeah, they’re kryptonite.
Despite my passion for all things lemon, I never really liked lemon bars as a kid. Typically, they’d come out of a box (that was in the ’90s, when everything came out of a box, no matter how easy it’d be to make it on your own), and they were ultra-sweet, not that lemony, and kinda gloopy. I never got why people liked them, and unfortunately, they marred my opinion of lemon bars for 24 years.
Not so with these ones. They’re perfectly (and naturally!) sweet, deliciously tangy, and firm enough to hold a bite without gloobing all over the place.
BASICALLY, THESE LEMON BARS ARE A DREAM DESSERT FOR LEMON LOVERS LIKE ME.
And that pink color? That’s courtesy of my pals over at Arbor Teas, a local Michigan tea company that sources the world’s finest USDA certified organic teas. All their gorgeous leaves come in backyard-compostable packaging, so they’re just about as sustainable as it gets. And a bonus for all my Ann Arbor friends: they’re right nearby, and they offer free delivery in the City of Ann Arbor. Why would you get your tea anywhere else?
These here Hibiscus Lemon Bars were not easy to attain, however. No, sir. I typically test recipes about 3 times before I determine that they’re good enough to blog. With this one, I lost count.
I wanted to make sure that it maintained the platonic ideal of a lemon bar without being loaded down with cups and cups of sugar. So I tested it with varying levels of both maple syrup and honey, and finally settled on this amount. (Side note: do not make it with honey. I repeat, do not make this recipe with honey. It’s maple syrup or bust, kids.)
The crust is walnut-based, with a shortbread-y texture and a subtle sweetness that provide a lovely contrast to the sweet, tart filling. Feel free to sub in almonds or even pecans here; any nut will deliver a roasty-toasty flavor that elevates these bars to new heights.
AND, PERHAPS MOST IMPORTANTLY, THE TEA.
Steep it for longer than usual here, so that all those flavors really have a chance to get to know each other. Remember, you’re steeping it in warm, not hot, liquid, so it will take longer for the flavor to come out. I use a glass measuring cup, microwave the lemon juice in it for about 15 seconds, then stir in the hibiscus, letting it hang out on the counter while I do everything else.
Chill the bars in the fridge for a bit before cutting into them; they’ll taste better and cut easier. And make sure to use a very, very sharp knife to get those nice, clean cuts. If you’re not worried about a touch of refined sugar, a dusting of powdered sugar on top certainly couldn’t hurt. (Or, alternatively, you could whiz up your own unrefined powdered sugar with maple or coconut sugar and corn starch. Up to you.)
Either way, these are the perfect light dessert as we (maybe? hopefully? please?) edge into those warm summer days. Best enjoyed with a tall glass of iced hibiscus tea. Just sayin’.
Serves 8
Ingredients
For the crust:
- 1 cup raw walnuts
- 1/3 cup whole wheat pastry flour
- 3 Tbsp unsalted butter, melted and cooled
- 3 Tbsp pure maple syrup
- 1/4 tsp kosher salt
For the hibiscus lemon filling:
- 1/2 cup freshly squeezed lemon juice, from about 4 medium-large lemons
- 2 Tbsp Arbor Teas Organic Hibiscus tea
- 1 Tbsp lemon zest, from 1 lemon
- 1/2 cup pure maple syrup
- 4 large eggs
- 1/4 tsp kosher salt
- 3 Tbsp whole wheat pastry flour, sifted
Directions
- Microwave lemon juice for about 15 seconds, just to warm slightly. Stir in hibiscus tea and set aside to steep for 20-25 minutes while you prepare everything else.
- Line an 8×8 square baking dish with parchment paper and set aside. Preheat the oven to 325° F.
- Make the crust: In a food processor, pulse walnuts until coarsely ground. Add flour, melted butter, maple syrup, and salt. Blend for 30-60 seconds, or until just combined. Press crust evenly into bottom of lined baking dish.
- Pre-bake the crust: Bake crust for 15-18 minutes, or until just starting to turn golden around the edges. Remove from oven and allow to cool for 2-3 minutes.
- Make the filling: Strain the lemon juice through a fine-mesh sieve; discard hibiscus. In a medium bowl, combine hibiscus lemon juice, lemon zest, maple syrup, eggs, and salt. Whisk until just combined, then add sifted flour and whisk to combine once more. Filling will be very thin and liquidy.
- Pour filling over warm crust. Bake for 20-23 minutes, or until filling no longer jiggles in the center. Cool completely in the pan on a wire rack, then transfer to fridge and chill for at least 4 hours or overnight. Use a sharp knife to slice and enjoy!
Recipe Notes:
If you do not have a food processor, crush walnuts in a bag with a rolling pin or the bottom of a heavy pan. Stir together crust ingredients in a medium bowl.
Recipe by Emily at Feelin' Whisky.
Submit a Recipe
